- 1、kubernetes集群命令行工具kubectl
- 1、kubectl 概述
- 2、kubectl 命令的语法
- 3、kubectl help 获取更多信息
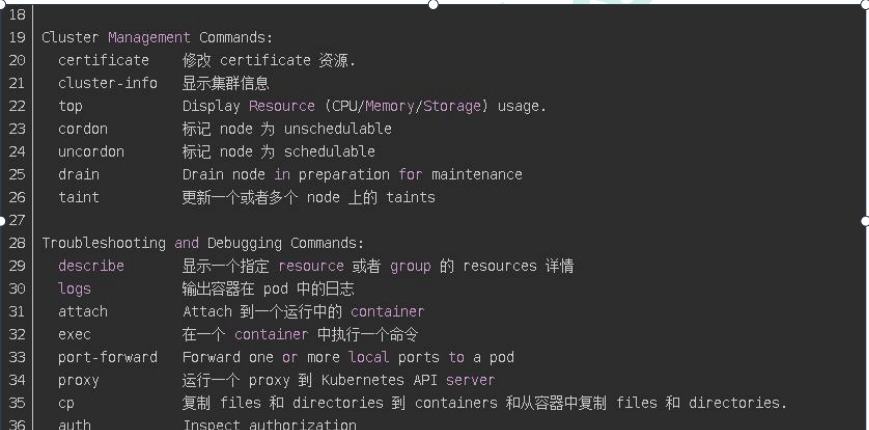
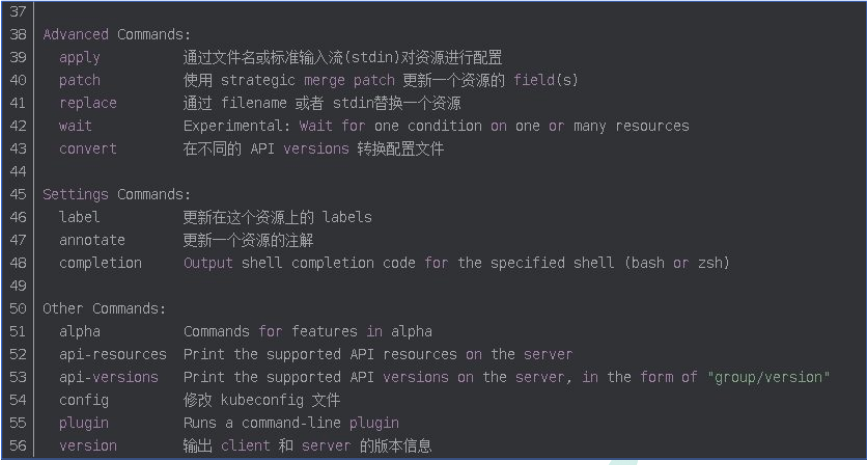
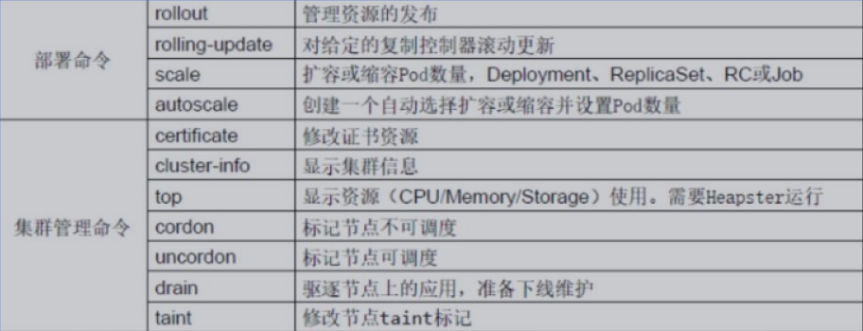
- 4、kubectl子命令使用分类
- 二、kubernetes核心技术-Pod
- 1、Pod概述
- 2、Pod特性
- 3、Pod的分类
- 4、Pod生命周期和重启策略
- 5、Pod资源配置
- 三、kubernetes核心技术-Controller控制器
- 1、ReplicationController
- 2、Replica Set
- 3、Deployment
- 4、Horizontal Pod Autoscaler
- 其他随身笔记
- 1、如何快速编写yaml文件
- 2、镜像拉取策略
- 3、Pod资源限制示例
- 4、Pod重启策略
- 5、Pod健康检查
- 6、创建Pod流程
- 7、Pod调度
- 1、Pod资源限制对Pod调用产生影响
- 2、节点选择器标签影响Pod调度(nodeSelector)
- 3、节点亲和性影响Pod调度
- 4、污点
- 5、污点容忍
- 四、kubernetes核心-controller
- 1、什么是controller
- 2、Pod和Controller关系
- 3、Deployment控制器应用场景
- 4、yaml文件字段说明
- 5、Deployment控制器部署应用
- 6、升级回滚
- 7、弹性伸缩
- 五、 kubernetest核心技术-Service
- 六、StatefulSet-部署有状态应用
- 1、无状态和有状态
- 2、部署有状态应用
- 3、StatefulSet部署有状态服务
- 七、kubernetes核心技术-controller(DaemonSet)-部署守护进程
- 八、kubernetes核心技术-Controller(Job和Cronjob)-一次任务和定时任务
- 九、kubernetes核心技术-配置管理-Secret
- 十、kubernetes核心技术-配置管理-ConfigMap
- 十一、kubernetes核心技术-集群安全机制
- 1、概述
- 2、RBAC介绍
- 3、RBAC实现鉴权
- 十二、kubernetes核心技术-Ingress
- 二十二、kubernetes核心技术-Helm(引入)
- 1、Helm引入
- 2、使用Helm可以解决哪些问题?
- 3、Helm介绍
- 4、Helm v3变化
- 5、helm安装
- 6、配置helm仓库
- 7.使用helm快速部署一个应用
- 8、自定义chart部署
- 二十三、kubernetes核心技术-持久化存储
- 1、nfs,网络存储
- 2、持久化存储 pv和pvc
1、kubernetes集群命令行工具kubectl
1、kubectl 概述
kubectl是Kubernetes集群的命令行工具,通过kubectl能够对集群本身进行管理,并能够在集群上运行容器化应用的安装部署。
2、kubectl 命令的语法
kubectl [command] [TYPE] [NAME] [flags](1)comand:指定要对资源执行的操作,例如 create、get、describe 和 delete
(2)TYPE:指定资源类型,资源类型是大小写敏感的,开发者能够以单数、复数和缩略的 形式。例如:
kubectl get pod pod1
kubectl get pods pod1
(3)NAME:指定资源的名称,名称也大小写敏感的。如果省略名称,则会显示所有的资源, 例如:
kubectl get pods3、kubectl help 获取更多信息
#获取kubectl帮助方法
[root@k8s-master1 ~]# kubectl --help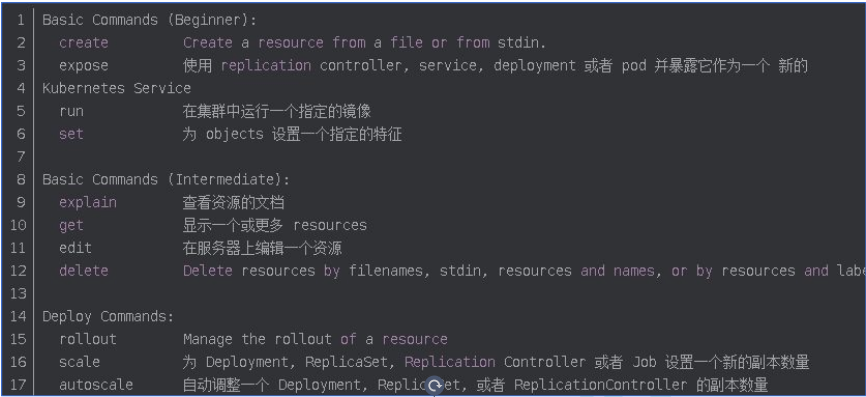
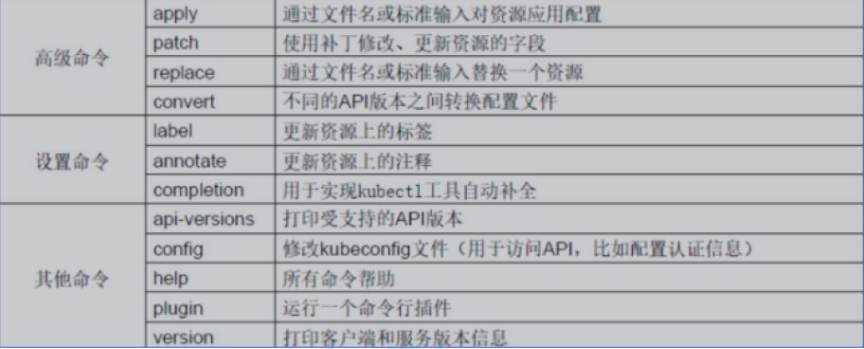
4、kubectl子命令使用分类
(1)基础命令

(2)部署和集群管理命令
(3)故障和调试命令

(4)其他命令
二、kubernetes核心技术-Pod
1、Pod概述
Pod是k8s系统中可以创建和管理的最小单元,是资源对象模型中由用户创建或部署的最小资源对象模型,也是在k8s上运行容器化应用的资源对象,其他的资源对象都是用来支撑或者扩展Pod对象功能的,比如控制器对象是用来管控Pod对象的,Service或者Ingress资源对象是用来暴露Pod引用对象的,PersistentVolume资源对象是用来为Pod 提供存储等等,k8s不会直接处理容器,而是Pod,Pod是由一个或多个container组成。
Pod是Kubernetes的最重要概念,每一个Pod都有一个特殊的被称为”根容器“的Pause 容器。Pause容器对应的镜像属于Kubernetes平台的一部分,除了Pause容器,每个Pod 还包含一个或多个紧密相关的用户业务容器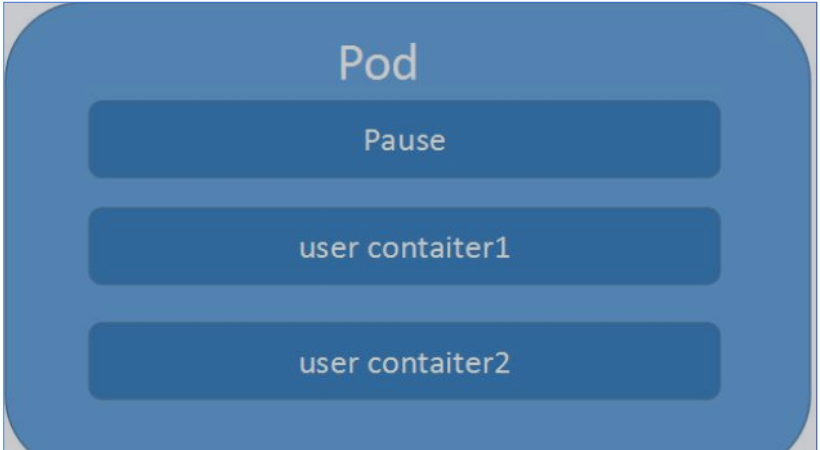
(1)Podvs应用每个Pod都是应用的一个实例,有专用的IP
(2)Podvs容器一个Pod可以有多个容器,彼此间共享网络和存储资源,每个Pod中有一个Pause容器保存所有的容器状态,通过管理pause容器,达到管理pod中所有容器的效果
(3)Podvs节点同一个Pod中的容器总会被调度到相同Node节点,不同节点间Pod的通信基于虚拟二层网络技术实现
(4)PodvsPod
普通的Pod和静态Pod
2、Pod特性
(1)资源共享
一个Pod里的多个容器可以共享存储和网络,可以看作一个逻辑的主机。共享的如namespace,cgroups或者其他的隔离资源。
多个容器共享同一networknamespace,由此在一个Pod里的多个容器共享Pod的IP和端口namespace,所以一个Pod内的多个容器之间可以通过localhost来进行通信,所需要注意的是不同容器要注意不要有端口冲突即可。不同的Pod有不同的IP,不同Pod内的多个容器之前通信,不可以使用IPC(如果没有特殊指定的话)通信,通常情况下使用Pod 的IP进行通信.
一个Pod里的多个容器可以共享存储卷,这个存储卷会被定义为Pod的一部分,并且可以挂载到该Pod里的所有容器的文件系统上。
(2)生命周期短暂
Pod属于生命周期比较短暂的组件,比如,当Pod所在节点发生故障,那么该节点上的Pod 会被调度到其他节点,但需要注意的是,被重新调度的Pod是一个全新的Pod,跟之前的Pod没有半毛钱关系.
(3)平坦的网络
K8s集群中的所有Pod都在同一个共享网络地址空间中,也就是说每个Pod都可以通过其他Pod的IP地址来实现访问。
(4) Pod的基本使用方法
在kubernetes中对运行容器的要求为:容器的主程序需要一直在前台运行,而不是后台运行。应用需要改造成前台运行的方式。如果我们创建的Docker镜像的启动命令是后台执行程序,则在kubelet创建包含这个容器的pod之后运行完该命令,即认为Pod已经结束,将立刻销毁该Pod。如果为该Pod定义了RC,则创建、销毁会陷入一个无限循环的过程中。Pod可以由1个或多个容器组合而成。
3、Pod的分类
Pod有两种类型
(1)普通Pod
普通Pod一旦被创建,就会被放入到etcd中存储,随后会被KubernetesMaster调度到某个具体的Node上并进行绑定,随后该Pod对应的Node上的kubelet进程实例化成一组相关的Docker容器并启动起来。在默认情况下,当Pod里某个容器停止时,Kubernetes会自动检测到这个问题并且重新启动这个Pod里某所有容器,如果Pod所在的Node宕机,则会将这个Node上的所有Pod重新调度到其它节点上。
(2)静态Pod
静态Pod是由kubelet进行管理的仅存在于特定Node上的Pod,它们不能通过APIServer 进行管理,无法与ReplicationController、Deployment或DaemonSet进行关联,并且kubelet也无法对它们进行健康检查。
4、Pod生命周期和重启策略
(1)Pod的状态
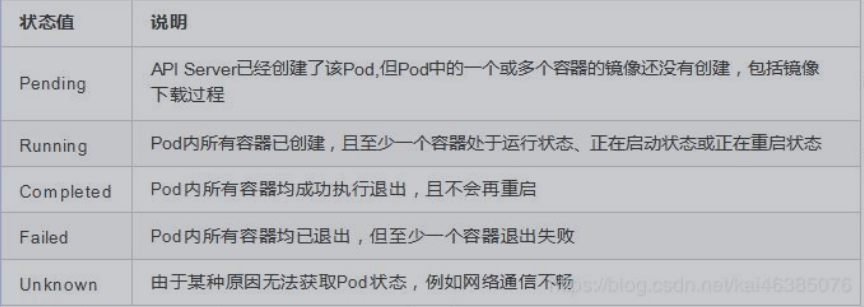
(2)Pod重启策略
Pod的重启策略包括Always、OnFailure和Never,默认值是Always
5、Pod资源配置
每个Pod都可以对其能使用的服务器上的计算资源设置限额,Kubernetes中可以设置限额的计算资源有CPU与Memory两种,其中CPU的资源单位为CPU数量,是一个绝对值而非相对值。Memory配额也是一个绝对值,它的单位是内存字节数。
Kubernetes里,一个计算资源进行配额限定需要设定以下两个参数:Requests该资源最小申请数量,系统必须满足要求Limits该资源最大允许使用的量,不能突破,当容器试图使用超过这个量的资源时,可能会被KubernetesKill并重启
(1)举例
Pod资源限制示例:
apiVersion: v1
kind: Pod
metadata:
  name: fronted

spec:
  containers:
  - name: db
    image: mysql
    env:
    - name: MYSQL_ROOT_PASSWORD
      value: "password"

    resources:
      requests:
        memory: "64Mi"
        cpu: "250m"
      limits:
        memory: "128Mi"
        cpu: "500m"
述代码表明MySQL容器申请最少0.25个CPU以及64MiB内存,在运行过程中容器所能使用的资源配额为0.5个CPU以及128MiB内存。
三、kubernetes核心技术-Controller控制器
1、ReplicationController
ReplicationController(RC)是Kubernetes系统中核心概念之一,当我们定义了一个RC并提交到Kubernetes集群中以后,Master节点上的ControllerManager组件就得到通知,定期检查系统中存活的Pod,并确保目标Pod实例的数量刚好等于RC的预期值,如果有过多或过少的Pod运行,系统就会停掉或创建一些Pod.此外我们也可以通过修改RC的副本数量,来实现Pod的动态缩放功能。
kubectl scale rc nginx --replicas=52、Replica Set
ReplicaSet跟ReplicationController没有本质的不同,只是名字不一样,ReplicaSet并且支持集合式的selector(ReplicationController仅支持等式)。
Kubernetes官方强烈建议避免直接使用ReplicaSet,而应该通过Deployment来创建RS和Pod。由于ReplicaSet是ReplicationController的代替物,因此用法基本相同,唯一的区别在于ReplicaSet支持集合式的selector。
3、Deployment
Deployment是Kubenetesv1.2引入的新概念,引入的目的是为了更好的解决Pod的编排问题,Deployment内部使用了ReplicaSet来实现。Deployment的定义与ReplicaSet的定义很类似,除了API声明与Kind类型有所区别。
4、Horizontal Pod Autoscaler
HorizontalPodAutoscal(Pod横向扩容简称HPA)与RC、Deployment一样,也属于一种Kubernetes资源对象。通过追踪分析RC控制的所有目标Pod的负载变化情况,来确定是否需要针对性地调整目标Pod的副本数,这是HPA的实现原理。
Kubernetes对Pod扩容与缩容提供了手动和自动两种模式,手动模式通过kubectlscale 命令对一个Deployment/RC进行Pod副本数量的设置。自动模式则需要用户根据某个性能指标或者自定义业务指标,并指定Pod副本数量的范围,系统将自动在这个范围内根据性能指标的变化进行调整。
(1) 手动扩容和缩容
kubectl scale deployment frontend --replicas 1(2) 自动扩容和缩容
HPA控制器基本Master的kube-controller-manager服务启动参数–horizontal-pod-autoscaler-sync-period定义的时长(默认值为30s),周期性地监测Pod的CPU使用率,并在满足条件时对RC或Deployment中的Pod副本数量进行调整,以符合用户定义的平均PodCPU使用率。
其他随身笔记
1、如何快速编写yaml文件
第一种:使用kubectl create命令生成yaml文件
kubectl create deployment web1 --image=nginx --dry-run -o yaml >web1.yaml第二种:使用kubectl get命令导出yaml文件(把部署好的资源转换成yaml文件)
kubectl get deploy nginx-dp -o yaml >nginx-dp.yaml2、镜像拉取策略
apiVersion: v1
kind: Pod
metadata:
  name: mypod

spec:
  containers:
    - name: nginx
      image: nginx:v1.14
      imagePullPolicy: Always
IfNotPresent: 默认值,镜像在宿主机上不存在时才拉取
Always: 每次创建Pod都会重新拉取一次镜像
Never: Pod永远不会主动拉取这个镜像
3、Pod资源限制示例
apiVersion: v1
kind: Pod
metadata:
  name: fronted

spec:
  containers:
  - name: db
    image: mysql
    env:
    - name: MYSQL_ROOT_PASSWORD
      value: "password"

    resources:
      requests:
        memory: "64Mi"
        cpu: "250m"
      limits:
        memory: "128Mi"
        cpu: "500m"
4、Pod重启策略
apiVersion: v1
kind: Pod
metadata: dns-test
spec:
  containers:
  - name: busybox
     image: busybox:1.28.4
     args:
     - /bin/sh
     - -c
     - sleep 36000
  restartPolicy: Never
#Always: 当容器终止退出后,总是重启容器,默认策略
#OnFailure: 当容器异常退出(退出状态码非0)时,才重启容器
#Never: 当容器终止退出时,从不重启容器
5、Pod健康检查
容器检查:running
应用层面健康检查:
#livenessProbe(存活检查) ##如果检查失败,将杀死容器,根据Pod的restartPolicy来操作。
#readinessProbe(就绪检查) ## 如果检查失败,kubernetes会把Pod从service endpoints中剔除。
#Probe 支持一下三种检查方法:
##httpget (发送HTTP请求,返回200-400范围状态码为成功)
##exec(执行shell命令返回状态码是0为成功)
##tcpSocket(发起TCP Socket建立成功)
6、创建Pod流程
master节点
1.create pod –>apiserver –>etcd —
2.scheduler –>apiserver –>etcd —-调度算法,把pod调度请求到某个node节点上
3.node节点 kubelet –>apiserver –>读取etcd拿到分配给当前节点的pod– docker创建容器
7、Pod调度
影响调度的属性
1、Pod资源限制对Pod调用产生影响
2、节点选择器标签影响Pod调度(nodeSelector)
spec:
  nodeSelector:
  env_role: dev
(首先对节点创建标签)
[root@k8s-master1 ~]# kubectl label nodes k8s-node1 env_role=dev
node/k8s-node1 labeled
[root@k8s-master1 ~]# kubectl label nodes k8s-node2 env_role=prod
node/k8s-node2 labeled
[root@k8s-master1 ~]#
查看标签
[root@k8s-master1 ~]# kubectl get nodes k8s-node1 --show-labels
NAME        STATUS   ROLES    AGE   VERSION   LABELS
k8s-node1   Ready    <none>   7h    v1.20.5   beta.kubernetes.io/arch=amd64,beta.kubernetes.io/os=linux,env_role=dev,kubernetes.io/arch=amd64,kubernetes.io/hostname=k8s-node1,kubernetes.io/os=linux
[root@k8s-master1 ~]# kubectl get nodes k8s-node2 --show-labels
NAME        STATUS   ROLES    AGE     VERSION   LABELS
k8s-node2   Ready    <none>   4h21m   v1.20.5   beta.kubernetes.io/arch=amd64,beta.kubernetes.io/os=linux,env_role=prod,kubernetes.io/arch=amd64,kubernetes.io/hostname=k8s-node2,kubernetes.io/os=linux
[root@k8s-master1 ~]#
3、节点亲和性影响Pod调度
节点亲和性:nodeAffinity和之前的nodeSelector基本一样的,根据节点上标签约束来决定对Pod调度到哪些节点上
(1) 硬亲和性
约束条件必须满足
(2)软亲和性
尝试瞒住,不保证
(3)反亲和性
4、污点
Taint污点:节点不做普通分配调度,是节点属性
场景:
- 专用节点
- 配置特殊硬件节点
- 基于Taint驱逐
1、查看节点污点情况
kubectl describe node k8s-node1|grep  Taint

污点值有三个
NoSchedule:一定不被调度
PreferNoSchedule:尽量不被调度
NoExecute: 不会调度,并且还驱逐Node已有Pod

2、为节点添加污点
kubectl taint node [node] key=value:污点三个值

例子:
kubectl create deployment web --image=nginx
kubectl scale deployment web --replicas=5
[root@k8s-master1 ~]# kubectl get pods -o wide
NAME                  READY   STATUS    RESTARTS   AGE   IP           NODE        NOMINATED NODE   READINESS GATES
web-96d5df5c8-hnstw   1/1     Running   0          38s   10.244.0.4   k8s-node1   <none>           <none>
web-96d5df5c8-mznh7   1/1     Running   0          38s   10.244.1.3   k8s-node2   <none>           <none>
web-96d5df5c8-ncqvj   1/1     Running   0          38s   10.244.1.4   k8s-node2   <none>           <none>
web-96d5df5c8-rfzxn   1/1     Running   0          81s   10.244.0.3   k8s-node1   <none>           <none>
web-96d5df5c8-wxhj9   1/1     Running   0          38s   10.244.1.5   k8s-node2   <none>           <none>
[root@k8s-master1 ~]#
(没有污点时候,是自动调度到node节点)
#删除deployment
kubectl delete deployment web
#给k8s-node1打上污点
[root@k8s-master1 ~]# kubectl taint node k8s-node1 buxijiao=yes:NoSchedule
node/k8s-node1 tainted
[root@k8s-master1 ~]# kubectl describe node k8s-node1|grep Taint
Taints:             buxijiao=yes:NoSchedule
[root@k8s-master1 ~]#
#重新创建deployment
kubectl create deployment web --image=nginx
kubectl scale deployment web --replicas=5
#查看信息,都调度到看k8s-node2上
[root@k8s-master1 ~]# kubectl get pods -o wide
NAME                  READY   STATUS    RESTARTS   AGE   IP            NODE        NOMINATED NODE   READINESS GATES
web-96d5df5c8-2sh7r   1/1     Running   0          70s   10.244.1.6    k8s-node2   <none>           <none>
web-96d5df5c8-mfpzb   1/1     Running   0          56s   10.244.1.9    k8s-node2   <none>           <none>
web-96d5df5c8-n6sjt   1/1     Running   0          56s   10.244.1.10   k8s-node2   <none>           <none>
web-96d5df5c8-w7s2g   1/1     Running   0          56s   10.244.1.7    k8s-node2   <none>           <none>
web-96d5df5c8-wsgqd   1/1     Running   0          56s   10.244.1.8    k8s-node2   <none>           <none>
[root@k8s-master1 ~]#
#查看污点
[root@k8s-master1 ~]# kubectl describe node k8s-node1|grep Taint
Taints:             buxijiao=yes:NoSchedule
#删除污点
[root@k8s-master1 ~]# kubectl taint node k8s-node1 buxijiao-
node/k8s-node1 untainted
[root@k8s-master1 ~]# kubectl describe node k8s-node1|grep Taint
Taints:             <none>
[root@k8s-master1 ~]#
5、污点容忍
虽然节点上设置了污点,但是pod可以容忍这个污点,就会被调度
spec:
  tolerations:
  - key: "key"
    operator: "Equal"
    value: "value"
    effect: "NoSchedule"
四、kubernetes核心-controller
1、什么是controller
在集群上管理和运行容器的对象
- 确保预期的pod副本数量
- 无状态应用部署
- 有状态应用部署
2、Pod和Controller关系
Pod是通过Controller实现应用的运维,比如伸缩,滚动升级等等。
Pod和Controller之间通过label标签建立关系的。(selector)
3、Deployment控制器应用场景
常用的是deployment应用场景
- 部署无状态应用
- 管理pod和ReplicaSet
- 部署,滚动升级等功能
例如:web服务,微服务
4、yaml文件字段说明
#第一步 导出yaml文件
kubectl create deployment web --dry-run -o yaml --image=nginx > web.yaml
#第二步 使用yaml部署应用
kubectl apply -f web.yaml
#第三步 对外发布(暴露对外端口号)

kubectl expose deployment web --port=80 --type=NodePort --target-port=80 --name=web --dry-run -o yaml >web-svc.yaml
kubectl apply -f web-svc.yaml
[root@k8s-master1 ~]# kubectl get svc
NAME         TYPE        CLUSTER-IP   EXTERNAL-IP   PORT(S)        AGE
kubernetes   ClusterIP   10.0.0.1     <none>        443/TCP        22h
web          NodePort    10.0.0.2     <none>        80:31192/TCP   11s
浏览器访问:nodeip:31192
5、Deployment控制器部署应用
[root@k8s-master1 ~]# more web.yaml
apiVersion: apps/v1
kind: Deployment
metadata:
  labels:
    app: web
  name: web
spec:
  replicas: 2
  selector:
    matchLabels:
      app: web
  strategy: {}
  template:
    metadata:
      labels:
        app: web
    spec:
      containers:
      - image: nginx:1.14
        name: nginx
[root@k8s-master1 ~]#
kubectl apply -f web.yaml
[root@k8s-master1 ~]# kubectl get pods
NAME                   READY   STATUS    RESTARTS   AGE
web-5bb6fd4c98-h669w   1/1     Running   0          33s
web-5bb6fd4c98-rv597   1/1     Running   0          59s
[root@k8s-master1 ~]#
6、升级回滚
#升级
kubectl set image deployment web nginx=nginx:1.15
#查看升级状态
[root@k8s-master1 ~]# kubectl rollout status deployment web
deployment "web" successfully rolled out
[root@k8s-master1 ~]#
#查看升级版本
[root@k8s-master1 ~]# kubectl rollout history  deployment web
deployment.apps/web
REVISION  CHANGE-CAUSE
1         <none>
2         <none>
3         <none>

#回滚到上一个版本
[root@k8s-master1 ~]# kubectl rollout undo deployment web
deployment.apps/web rolled back
[root@k8s-master1 ~]#

# 回滚到指定版本
kubectl rollout undo deployment web --to-revision=3
7、弹性伸缩
kubectl scale deployment web --replicas=10五、 kubernetest核心技术-Service
1、service存在意义
- 防止Pod失联(服务发现)
- 定义一组Pod访问策略(负载均衡)
2、Pod和Service关系
- 根据lable和selector标签建立关联的
- 通过service实现pod的负载均衡
3、Service三种类型
kubectl expose –help
ClusterIP, NodePort, LoadBalancer
- ClusterIP:集群内部访问(默认)
#导出yaml文件
#kubectl expose deployment web --port=80 --target-port=80 --dry-run -o yaml >service1.yaml
#修改yaml文件,类型改为ClusterIP
[root@k8s-master1 ~]# cat service1.yaml
apiVersion: v1
kind: Service
metadata:
  creationTimestamp: null
  labels:
    app: web
  name: web
spec:
  ports:
  - port: 80
    protocol: TCP
    targetPort: 80
  selector:
    app: web
  type: ClusterIP
status:
  loadBalancer: {}
[root@k8s-master1 ~]#
[root@k8s-master1 ~]# kubectl apply -f service1.yaml
service/web created
[root@k8s-master1 ~]# kubectl get svc
NAME         TYPE        CLUSTER-IP   EXTERNAL-IP   PORT(S)   AGE
kubernetes   ClusterIP   10.0.0.1     <none>        443/TCP   24h
web          ClusterIP   10.0.0.146   <none>        80/TCP    6s
[root@k8s-master1 ~]#
#内部访问
[root@k8s-node1 ~]# curl 10.0.0.146- NodePort:对外访问应用服务
#修改name及类型为NodePort
[root@k8s-master1 ~]# cat service1.yaml
apiVersion: v1
kind: Service
metadata:
  creationTimestamp: null
  labels:
    app: web
  name: web1
spec:
  ports:
  - port: 80
    protocol: TCP
    targetPort: 80
  selector:
    app: web
  type: NodePort
status:
  loadBalancer: {}
[root@k8s-master1 ~]#

[root@k8s-master1 ~]# kubectl apply -f service1.yaml
service/web1 created
[root@k8s-master1 ~]# kubectl get svc
NAME         TYPE        CLUSTER-IP   EXTERNAL-IP   PORT(S)        AGE
kubernetes   ClusterIP   10.0.0.1     <none>        443/TCP        24h
web          ClusterIP   10.0.0.146   <none>        80/TCP         4m24s
web1         NodePort    10.0.0.54    <none>        80:30409/TCP   5s
[root@k8s-master1 ~]#
#客户端访问
node:30409- LoadBalancer: 对外访问应用服务,公有云
node内网部署应用,外网一般不能访问到的。,找一台可以进行外网访问机器,安装nginx,反向代理
LoadBalancer:公有云,负载均衡,控制器
六、StatefulSet-部署有状态应用
1、无状态和有状态
(1) 无状态:
- 认为pod都是一样的
- 没有顺序要求
- 不用考虑在哪个node运行
- 随意进行伸缩和扩展
(2)有状态
- 上面因素都需要考虑到
- 让每个pod都是对立的,保持pod启动顺序和唯一性
- 唯一的网络标识符,持久存储
- 有序,比如mysql主从
2、部署有状态应用
- 无头service
ClusterIP等于none
3、StatefulSet部署有状态服务
[root@k8s-master1 ~]# cat sts.yaml
apiVersion: v1
kind: Service
metadata:
  name: nginx
  labels:
    app: nginx
spec:
  ports:
  - port: 80
    name: web
  clusterIP: None
  selector:
    app: nginx

---

apiVersion: apps/v1
kind: StatefulSet
metadata:
  name: nginx-statefulset
  namespace: default
spec:
  serviceName: nginx
  replicas: 3
  selector:
    matchLabels:
      app: nginx
  template:
    metadata:
      labels:
        app: nginx
    spec:
      containers:
      - name: nginx
        image: nginx:latest
        ports:
        - containerPort: 80
[root@k8s-master1 ~]#
[root@k8s-master1 ~]# kubectl apply -f sts.yaml
#查看pod,每个都是唯一名称
[root@k8s-master1 ~]# kubectl get pods
NAME                  READY   STATUS    RESTARTS   AGE
nginx-statefulset-0   1/1     Running   0          102s
nginx-statefulset-1   1/1     Running   0          64s
nginx-statefulset-2   1/1     Running   0          35s
[root@k8s-master1 ~]# kubectl get svc
NAME         TYPE        CLUSTER-IP   EXTERNAL-IP   PORT(S)        AGE
kubernetes   ClusterIP   10.0.0.1     <none>        443/TCP        31h
nginx        ClusterIP   None         <none>        80/TCP         119s
deployment和statefuset区别:有身份的(唯一标识)
根据主机名+ 按照一定规则生成域名
- 每个pod有唯一主机名
- 唯一域名
- 格式: 主机名称.service名称.名称空间.svc.cluster.local
nginx-statefulset-0.nginx.default.svc.cluster.local
七、kubernetes核心技术-controller(DaemonSet)-部署守护进程
- 部署守护进程DaemonSet
在每个node上运行一个pod,新加入的pod也同样运行在一个pod里面
[root@k8s-master1 ~]# cat ds.yaml
apiVersion: apps/v1
kind: DaemonSet
metadata:
  name: ds-test
  labels:
    app: filebeat
spec:
  selector:
    matchLabels:
      app: filebeat
  template:
    metadata:
      labels:
        app: filebeat
    spec:
      containers:
      - name: logs
        image: nginx
        ports:
        - containerPort: 80
        volumeMounts:
        - name: varlog
          mountPath: /tmp/log
      volumes:
      - name: varlog
        hostPath:
          path: /var/log
[root@k8s-master1 ~]#
[root@k8s-master1 ~]# kubectl apply -f ds.yaml

[root@k8s-master1 ~]# kubectl get pods
NAME                  READY   STATUS    RESTARTS   AGE
ds-test-pd57r         1/1     Running   0          81s
ds-test-xbxxt         1/1     Running   0          81s
web-f686c9cdf-7jwhh   1/1     Running   0          8h
web-f686c9cdf-q85ns   1/1     Running   0          8h
[root@k8s-master1 ~]# kubectl exec -it ds-test-pd57r  /bin/bash
root@ds-test-pd57r:/# ls /tmp/log/
八、kubernetes核心技术-Controller(Job和Cronjob)-一次任务和定时任务
- job(一次性任务)
[root@k8s-master1 ~]# more job.yaml
apiVersion: batch/v1
kind: Job
metadata:
  name: pi
spec:
  template:
    spec:
      containers:
      - name: pi
        image: perl
        command: ["perl",  "-Mbignum=bpi", "-wle", "print bpi(2000)"]
      restartPolicy: Never
  backoffLimit: 4
[root@k8s-master1 ~]#
[root@k8s-master1 ~]# kubectl create -f job.yaml
job.batch/pi created
[root@k8s-master1 ~]#
[root@k8s-master1 ~]# kubectl get pods|grep pi
pi-pwplh              0/1     Completed   0          2m23s
[root@k8s-master1 ~]# kubectl get jobs
NAME   COMPLETIONS   DURATION   AGE
pi     1/1           114s       2m29s
[root@k8s-master1 ~]#
#查看任务运算的结果
[root@k8s-master1 ~]# kubectl logs pi-pwplh
#删除任务
[root@k8s-master1 ~]# kubectl delete jobs pi
job.batch "pi" deleted
[root@k8s-master1 ~]# kubectl get jobs
No resources found in default namespace.- cronjob(定时任务)
[root@k8s-master1 ~]# cat cronjob.yaml
apiVersion: batch/v1beta1
kind: CronJob
metadata:
  name: hello
spec:
  schedule: "*/1 * * * *"
  jobTemplate:
    spec:
      template:
        spec:
          containers:
          - name: hello
            image: busybox
            args:
            - /bin/sh
            - -c
            - date; echo Hello from the Kubernetes cluster
          restartPolicy: OnFailure

[root@k8s-master1 ~]#
[root@k8s-master1 ~]# kubectl apply -f cronjob.yaml
[root@k8s-master1 ~]# kubectl get pods -o wide|grep -i hello
hello-1618487460-l7sv5   0/1     Completed           0          76s   10.244.0.19   k8s-node1   <none>           <none>
hello-1618487520-ws6t5   0/1     ContainerCreating   0          15s   <none>        k8s-node2   <none>           <none>
[root@k8s-master1 ~]#
[root@k8s-master1 ~]# kubectl get cronjobs
NAME    SCHEDULE      SUSPEND   ACTIVE   LAST SCHEDULE   AGE
hello   */1 * * * *   False     1        36s             2m35s
[root@k8s-master1 ~]#
[root@k8s-master1 ~]# kubectl logs hello-1618487460-l7sv5
Thu Apr 15 11:51:49 UTC 2021
Hello from the Kubernetes cluster
[root@k8s-master1 ~]#
[root@k8s-master1 ~]# kubectl logs hello-1618487520-ws6t5
Thu Apr 15 11:52:50 UTC 2021
Hello from the Kubernetes cluster
[root@k8s-master1 ~]#
#删除任务
[root@k8s-master1 ~]# kubectl delete cronjobs hello
cronjob.batch "hello" deleted
[root@k8s-master1 ~]# kubectl get cronjobs
No resources found in default namespace.
[root@k8s-master1 ~]#
九、kubernetes核心技术-配置管理-Secret
- Secret
作用:加密数据存在etcd里面,让pod容器以挂载Volume方式进行访问。
场景:凭证
base64编码:
[root@k8s-master1 ~]# echo -n "admin"|base64
YWRtaW4=
[root@k8s-master1 ~]#
1、创建secret加密数据
[root@k8s-master1 ~]# more secret.yaml
apiVersion: v1
kind: Secret
metadata:
  name: mysecret
type: Opaque
data:
  username: YWRtaW4=
  password: MWYyZDFlMmU2N2Rm
[root@k8s-master1 ~]#
[root@k8s-master1 ~]# kubectl apply -f secret.yaml
secret/mysecret created
[root@k8s-master1 ~]# kubectl get secret
NAME                  TYPE                                  DATA   AGE
default-token-mbbrl   kubernetes.io/service-account-token   3      32h
mysecret              Opaque                                2      4s
[root@k8s-master1 ~]#
2、以变量形式挂载到pod容器中
[root@k8s-master1 ~]# more secret-var.yaml
apiVersion: v1
kind: Pod
metadata:
  name: mypod
spec:
  containers:
  - name: nginx
    image: nginx
    env:
      - name: SECRET_USERNAME
        valueFrom:
          secretKeyRef:
            name: mysecret
            key: username
      - name: SECRET_PASSWORD
        valueFrom:
          secretKeyRef:
            name: mysecret
            key: password
[root@k8s-master1 ~]#
[root@k8s-master1 ~]# kubectl apply -f secret-var.yaml
#查看容器
[root@k8s-master1 ~]# kubectl get pods
NAME                  READY   STATUS    RESTARTS   AGE
ds-test-pd57r         1/1     Running   0          66m
ds-test-xbxxt         1/1     Running   0          66m
mypod                 1/1     Running   0          45s
web-f686c9cdf-7jwhh   1/1     Running   0          9h
web-f686c9cdf-q85ns   1/1     Running   0          9h
#进入容器,查看变量
[root@k8s-master1 ~]# kubectl exec -it mypod  /bin/bash
root@mypod:/# echo $SECRET_USERNAME
admin
root@mypod:/# echo $SECRET_PASSWORD
1f2d1e2e67df
root@mypod:/#
3、以Volume形式挂载Pod容器中
[root@k8s-master1 ~]# cat secret-vol.yaml
apiVersion: v1
kind: Pod
metadata:
  name: mypod1
spec:
  containers:
  - name: nginx
    image: nginx
    volumeMounts:
    - name: foo
      mountPath: "/etc/foo"
      readOnly: true
  volumes:
  - name: foo
    secret:
      secretName: mysecret
[root@k8s-master1 ~]# kubectl apply -f secret-vol.yaml
pod/mypod1 created
[root@k8s-master1 ~]#
#进入容器
[root@k8s-master1 ~]# kubectl  exec -it mypod1 /bin/bash
kubectl exec [POD] [COMMAND] is DEPRECATED and will be removed in a future version. Use kubectl exec [POD] -- [COMMAND] instead.
root@mypod1:/# ls /etc/foo/
password  username
root@mypod1:/# cat /etc/foo/username
adminroot@mypod1:/# cat /etc/foo/password
1f2d1e2e67dfroot@mypod1:/#
十、kubernetes核心技术-配置管理-ConfigMap
- ConfigMap
作用:存储不加密数据到etcd,让Pod以变量或者Volume挂载到容器中
场景:配置文件
1、创建配置文件
[root@k8s-master1 ~]# cat redis.properties
redis.host=127.0.0.1
redis.port=6379
redis.password=123456
[root@k8s-master1 ~]#
2、创建configmap
[root@k8s-master1 ~]# kubectl get configmap
NAME               DATA   AGE
kube-root-ca.crt   1      32h
[root@k8s-master1 ~]# kubectl get cm
NAME               DATA   AGE
kube-root-ca.crt   1      32h
[root@k8s-master1 ~]# kubectl create configmap redis-config --from-file=redis.properties
configmap/redis-config created
[root@k8s-master1 ~]# kubectl get cm
NAME               DATA   AGE
kube-root-ca.crt   1      32h
redis-config       1      5s
[root@k8s-master1 ~]#
#查看configmap的详细信息
[root@k8s-master1 ~]# kubectl describe cm redis-config
Name:         redis-config
Namespace:    default
Labels:       <none>
Annotations:  <none>

Data
====
redis.properties:
----
redis.host=127.0.0.1
redis.port=6379
redis.password=123456

Events:  <none>
[root@k8s-master1 ~]#
3、以Volume形式挂载到pod容器中
[root@k8s-master1 ~]# more cm.yaml
apiVersion: v1
kind: Pod
metadata:
  name: mypod
spec:
  containers:
    - name: busybox
      image: busybox
      command: [ "/bin/sh","-c","cat /etc/config/redis.properties" ]
      volumeMounts:
      - name: config-volume
        mountPath: /etc/config
  volumes:
    - name: config-volume
      configMap:
        name: redis-config
  restartPolicy: Never

[root@k8s-master1 ~]# kubectl apply -f cm.yaml
pod/mypod created
[root@k8s-master1 ~]#
#查看容器日志
[root@k8s-master1 ~]# kubectl logs mypod
redis.host=127.0.0.1
redis.port=6379
redis.password=123456
[root@k8s-master1 ~]#
4、以变量形式挂载到pod容器中
(1) 创建yaml,声明变量信息
[root@k8s-master1 ~]# more myconfig.yaml
apiVersion: v1
kind: ConfigMap
metadata:
  name: myconfig
  namespace: default
data:
  special.level: info
  special.type: hello
[root@k8s-master1 ~]#
[root@k8s-master1 ~]# kubectl apply -f myconfig.yaml
configmap/myconfig created
[root@k8s-master1 ~]#
[root@k8s-master1 ~]# kubectl get cm
NAME               DATA   AGE
kube-root-ca.crt   1      34h
myconfig           2      38s
redis-config       1      98m
[root@k8s-master1 ~]#
(2)以变量挂载
[root@k8s-master1 ~]# more config-var.yaml
apiVersion: v1
kind: Pod
metadata:
  name: mypod
spec:
  containers:
    - name: busybox
      image: busybox
      command: [ "/bin/sh", "-c", "echo $(LEVEL) $(TYPE)" ]
      env:
        - name: LEVEL
          valueFrom:
            configMapKeyRef:
              name: myconfig
              key: special.level
        - name: TYPE
          valueFrom:
            configMapKeyRef:
              name: myconfig
              key: special.type
  restartPolicy: Never
[root@k8s-master1 ~]#
[root@k8s-master1 ~]# kubectl apply -f config-var.yaml
#查看容器日志
[root@k8s-master1 ~]# kubectl logs mypod
info hello
[root@k8s-master1 ~]#
十一、kubernetes核心技术-集群安全机制
1、概述
(1)访问k8s集群时候,需要经过三个步骤完成具体操作
第一步 认证
第二步 鉴权(授权)
第三步 准入控制
(2) 进行访问时候,过程中都需要经过apiserver
apiserver做统一协调(访问过程中需要证书、token、或者用户名+密码)
如果访问pod,需要serviceAccount
第一步认证 传输安全
传输安全:对外不暴露8080端口,只能内部访问,对外使用端口6443
认证:客户端身份认证常用方式
- https证书认证,基于ca证书
- http token认证,通过token识别用户
- http基本认证,用户名+密码验证
第二步 鉴权(授权)
- 基于RBAC进行鉴权操作
- 基于角色访问控制
第三步 准入控制
- 就是准入控制器的列表,如果列表有请求内容,就通过,没有就拒绝
2、RBAC介绍
基于角色的访问控制
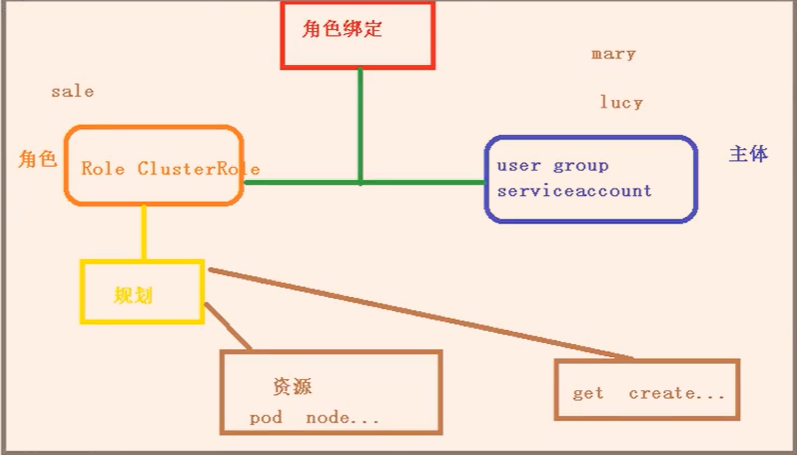
角色:
role,特定命名空间访问权限
ClusterRole:所有命名空间访问权限
角色绑定:
roleBinding: 角色绑定到主体
ClusterRoleBinding:集群角色绑定到主体
主体:
user: 用户
group: 用户组
serviceAccount: 服务账号
3、RBAC实现鉴权
1、创建命名空间
[root@k8s-master1 ~]# kubectl create  ns rolemo
namespace/rolemo created
[root@k8s-master1 ~]# kubectl get ns
NAME              STATUS   AGE
default           Active   35h
kube-node-lease   Active   35h
kube-public       Active   35h
kube-system       Active   35h
rolemo            Active   3s
[root@k8s-master1 ~]#
2、在新创建的命名空间创建pod
[root@k8s-master1 ~]# kubectl run nginx --image=nginx -n rolemo
pod/nginx created
[root@k8s-master1 ~]# kubectl get pods -n rolemo
NAME    READY   STATUS              RESTARTS   AGE
nginx   0/1     ContainerCreating   0          8s
[root@k8s-master1 ~]#
3、创建角色
[root@k8s-master1 ~]# cat rbac-role.yaml
kind: Role
apiVersion: rbac.authorization.k8s.io/v1
metadata:
  namespace: rolemo
  name: pod-reader
rules:
- apiGroups: [""] # "" indicates the core API group
  resources: ["pods"]
  verbs: ["get", "watch", "list"]
[root@k8s-master1 ~]# kubectl apply -f rbac-role.yaml
role.rbac.authorization.k8s.io/pod-reader created
[root@k8s-master1 ~]#
[root@k8s-master1 ~]# kubectl get role -n rolemo
NAME         CREATED AT
pod-reader   2021-04-15T15:04:55Z
[root@k8s-master1 ~]#
4、创建角色绑定
[root@k8s-master1 ~]#
[root@k8s-master1 ~]# cat rbac-rolebinding.yaml
kind: RoleBinding
apiVersion: rbac.authorization.k8s.io/v1
metadata:
  name: read-pods
  namespace: rolemo
subjects:
- kind: User
  name: xtyang # Name is case sensitive
  apiGroup: rbac.authorization.k8s.io
roleRef:
  kind: Role #this must be Role or ClusterRole
  name: pod-reader # this must match the name of the Role or ClusterRole you wish to bind to
  apiGroup: rbac.authorization.k8s.io
[root@k8s-master1 ~]# kubectl apply -f rbac-rolebinding.yaml
rolebinding.rbac.authorization.k8s.io/read-pods created
[root@k8s-master1 ~]# kubectl get role,rolebinding -n rolemo
NAME                                        CREATED AT
role.rbac.authorization.k8s.io/pod-reader   2021-04-15T15:04:55Z

NAME                                              ROLE              AGE
rolebinding.rbac.authorization.k8s.io/read-pods   Role/pod-reader   17s
[root@k8s-master1 ~]#
5、使用证书识别身份
[root@k8s-master1 ~]# mkdir /xtyang
[root@k8s-master1 ~]# cd /xtyang/
[root@k8s-master1 xtyang]# cp /root/TLS/k8s/ca* .
[root@k8s-master1 xtyang]# cat rabc-user.sh
cat > xtyang-csr.json <<EOF
{
  "CN": "xtyang",
  "hosts": [],
  "key": {
    "algo": "rsa",
    "size": 2048
  },
  "names": [
    {
      "C": "CN",
      "L": "BeiJing",
      "ST": "BeiJing"
    }
  ]
}
EOF

cfssl gencert -ca=ca.pem -ca-key=ca-key.pem -config=ca-config.json -profile=kubernetes xtyang-csr.json | cfssljson -bare xtyang

kubectl config set-cluster kubernetes \
  --certificate-authority=ca.pem \
  --embed-certs=true \
  --server=https://192.168.31.71:6443 \
  --kubeconfig=xtyang-kubeconfig

kubectl config set-credentials xtyang \
  --client-key=xtyang-key.pem \
  --client-certificate=xtyang.pem \
  --embed-certs=true \
  --kubeconfig=xtyang-kubeconfig

kubectl config set-context default \
  --cluster=kubernetes \
  --user=xtyang \
  --kubeconfig=xtyang-kubeconfig

kubectl config use-context default --kubeconfig=xtyang-kubeconfig
[root@k8s-master1 xtyang]#
[root@k8s-master1 xtyang]# ls
ca-config.json  ca.csr  ca-csr.json  ca-key.pem  ca.pem  rabc-user.sh
[root@k8s-master1 xtyang]# sh rabc-user.sh
#测试
[root@k8s-master1 xtyang]# kubectl get svc -n rolemo
十二、kubernetes核心技术-Ingress
1、把端口号对外暴露,通过ip+端口号进行访问
使用Servive里面的NodePort实现2、NodePort缺陷
在每个节点上都会启动端口,在访问时候通过任何节点,通过节点ip+暴露端口号实现访问
意味着每个端口只能使用一次,一个端口对应一个应用
实际访问中都是用域名,根据不同域名跳转到不同端口服务中。3、Ingress和Pod关系
pod和ingress通过service关联的。
ingress作为统一入口,由service关联一组pod4、ingress工作流程
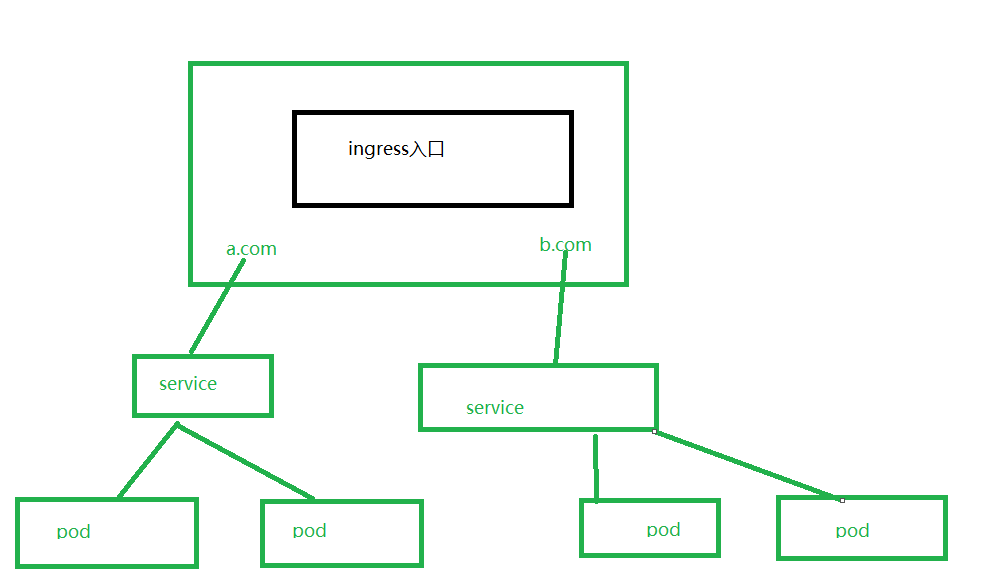
- 5、使用ingress
第一步 部署 ingress Controller
我们这里选择官方维护的nginx控制器,实现部署
第二步 创建 ingress规则
- 6、使用Ingress对外暴露应用
(1) 创建nginx应用,对外暴露端口使用NodePort
#创建deployment
[root@k8s-master1 ~]# kubectl create deployment web --image=nginx
#创建service
[root@k8s-master1 ~]# kubectl expose deployment web --port=80 --target-port=80 --type=NodePort
service/web exposed
[root@k8s-master1 ~]# kubectl get svc
NAME         TYPE        CLUSTER-IP   EXTERNAL-IP   PORT(S)        AGE
kubernetes   ClusterIP   10.0.0.1     <none>        443/TCP        47h
web          NodePort    10.0.0.112   <none>        80:31569/TCP   6s
[root@k8s-master1 ~]#
(2) 部署ingress controller
[root@k8s-master1 ~]# cat ingress-controller.yaml
apiVersion: v1
kind: Namespace
metadata:
name: ingress-nginx
labels:
app.kubernetes.io/name: ingress-nginx
app.kubernetes.io/part-of: ingress-nginx
---
kind: ConfigMap
apiVersion: v1
metadata:
name: nginx-configuration
namespace: ingress-nginx
labels:
app.kubernetes.io/name: ingress-nginx
app.kubernetes.io/part-of: ingress-nginx
---
kind: ConfigMap
apiVersion: v1
metadata:
name: tcp-services
namespace: ingress-nginx
labels:
app.kubernetes.io/name: ingress-nginx
app.kubernetes.io/part-of: ingress-nginx
---
kind: ConfigMap
apiVersion: v1
metadata:
name: udp-services
namespace: ingress-nginx
labels:
app.kubernetes.io/name: ingress-nginx
app.kubernetes.io/part-of: ingress-nginx
---
apiVersion: v1
kind: ServiceAccount
metadata:
name: nginx-ingress-serviceaccount
namespace: ingress-nginx
labels:
app.kubernetes.io/name: ingress-nginx
app.kubernetes.io/part-of: ingress-nginx
---
apiVersion: rbac.authorization.k8s.io/v1beta1
kind: ClusterRole
metadata:
name: nginx-ingress-clusterrole
labels:
app.kubernetes.io/name: ingress-nginx
app.kubernetes.io/part-of: ingress-nginx
rules:
- apiGroups:
- ""
resources:
- configmaps
- endpoints
- nodes
- pods
- secrets
verbs:
- list
- watch
- apiGroups:
- ""
resources:
- nodes
verbs:
- get
- apiGroups:
- ""
resources:
- services
verbs:
- get
- list
- watch
- apiGroups:
- ""
resources:
- events
verbs:
- create
- patch
- apiGroups:
- "extensions"
- "networking.k8s.io"
resources:
- ingresses
verbs:
- get
- list
- watch
- apiGroups:
- "extensions"
- "networking.k8s.io"
resources:
- ingresses/status
verbs:
- update
---
apiVersion: rbac.authorization.k8s.io/v1beta1
kind: Role
metadata:
name: nginx-ingress-role
namespace: ingress-nginx
labels:
app.kubernetes.io/name: ingress-nginx
app.kubernetes.io/part-of: ingress-nginx
rules:
- apiGroups:
- ""
resources:
- configmaps
- pods
- secrets
- namespaces
verbs:
- get
- apiGroups:
- ""
resources:
- configmaps
resourceNames:
# Defaults to "<election-id>-<ingress-class>"
# Here: "<ingress-controller-leader>-<nginx>"
# This has to be adapted if you change either parameter
# when launching the nginx-ingress-controller.
- "ingress-controller-leader-nginx"
verbs:
- get
- update
- apiGroups:
- ""
resources:
- configmaps
verbs:
- create
- apiGroups:
- ""
resources:
- endpoints
verbs:
- get
---
apiVersion: rbac.authorization.k8s.io/v1beta1
kind: RoleBinding
metadata:
name: nginx-ingress-role-nisa-binding
namespace: ingress-nginx
labels:
app.kubernetes.io/name: ingress-nginx
app.kubernetes.io/part-of: ingress-nginx
roleRef:
apiGroup: rbac.authorization.k8s.io
kind: Role
name: nginx-ingress-role
subjects:
- kind: ServiceAccount
name: nginx-ingress-serviceaccount
namespace: ingress-nginx
---
apiVersion: rbac.authorization.k8s.io/v1beta1
kind: ClusterRoleBinding
metadata:
name: nginx-ingress-clusterrole-nisa-binding
labels:
app.kubernetes.io/name: ingress-nginx
app.kubernetes.io/part-of: ingress-nginx
roleRef:
apiGroup: rbac.authorization.k8s.io
kind: ClusterRole
name: nginx-ingress-clusterrole
subjects:
- kind: ServiceAccount
name: nginx-ingress-serviceaccount
namespace: ingress-nginx
---
apiVersion: apps/v1
kind: Deployment
metadata:
name: nginx-ingress-controller
namespace: ingress-nginx
labels:
app.kubernetes.io/name: ingress-nginx
app.kubernetes.io/part-of: ingress-nginx
spec:
replicas: 1
selector:
matchLabels:
app.kubernetes.io/name: ingress-nginx
app.kubernetes.io/part-of: ingress-nginx
template:
metadata:
labels:
app.kubernetes.io/name: ingress-nginx
app.kubernetes.io/part-of: ingress-nginx
annotations:
prometheus.io/port: "10254"
prometheus.io/scrape: "true"
spec:
hostNetwork: true
# wait up to five minutes for the drain of connections
terminationGracePeriodSeconds: 300
serviceAccountName: nginx-ingress-serviceaccount
nodeSelector:
kubernetes.io/os: linux
containers:
- name: nginx-ingress-controller
image: lizhenliang/nginx-ingress-controller:0.30.0
args:
- /nginx-ingress-controller
- --configmap=$(POD_NAMESPACE)/nginx-configuration
- --tcp-services-configmap=$(POD_NAMESPACE)/tcp-services
- --udp-services-configmap=$(POD_NAMESPACE)/udp-services
- --publish-service=$(POD_NAMESPACE)/ingress-nginx
- --annotations-prefix=nginx.ingress.kubernetes.io
securityContext:
allowPrivilegeEscalation: true
capabilities:
drop:
- ALL
add:
- NET_BIND_SERVICE
# www-data -> 101
runAsUser: 101
env:
- name: POD_NAME
valueFrom:
fieldRef:
fieldPath: metadata.name
- name: POD_NAMESPACE
valueFrom:
fieldRef:
fieldPath: metadata.namespace
ports:
- name: http
containerPort: 80
protocol: TCP
- name: https
containerPort: 443
protocol: TCP
livenessProbe:
failureThreshold: 3
httpGet:
path: /healthz
port: 10254
scheme: HTTP
initialDelaySeconds: 10
periodSeconds: 10
successThreshold: 1
timeoutSeconds: 10
readinessProbe:
failureThreshold: 3
httpGet:
path: /healthz
port: 10254
scheme: HTTP
periodSeconds: 10
successThreshold: 1
timeoutSeconds: 10
lifecycle:
preStop:
exec:
command:
- /wait-shutdown
---
apiVersion: v1
kind: LimitRange
metadata:
name: ingress-nginx
namespace: ingress-nginx
labels:
app.kubernetes.io/name: ingress-nginx
app.kubernetes.io/part-of: ingress-nginx
spec:
limits:
- min:
memory: 90Mi
cpu: 100m
type: Container
[root@k8s-master1 ~]#
[root@k8s-master1 ~]# kubectl apply -f ingress-controller.yaml #查看ingress controller状态
[root@k8s-master1 ~]# kubectl get pods -n ingress-nginx
NAME                                       READY   STATUS    RESTARTS   AGE
nginx-ingress-controller-5dc64b58f-22wp6   1/1     Running   5          5m11s
[root@k8s-master1 ~]#
[root@k8s-master1 ~]# kubectl get pods -n ingress-nginx -o wide
NAME                                       READY   STATUS    RESTARTS   AGE    IP              NODE        NOMINATED NODE   READINESS GATES
nginx-ingress-controller-5dc64b58f-89db6   1/1     Running   2          172m   192.168.31.73   k8s-node2   <none>           <none>
[root@k8s-master1 ~]#
#在k8s-node2上查看
[root@k8s-node2 ~]# netstat  -lntup|grep 80
tcp        0      0 192.168.31.73:2380      0.0.0.0:*               LISTEN      9258/etcd
tcp        0      0 0.0.0.0:80              0.0.0.0:*               LISTEN      15818/nginx: master
tcp6       0      0 :::80                   :::*                    LISTEN      15818/nginx: master
[root@k8s-node2 ~]# netstat  -lntup|grep 443
tcp        0      0 0.0.0.0:443             0.0.0.0:*               LISTEN      15818/nginx: master
tcp6       0      0 :::443                  :::*                    LISTEN      15818/nginx: master
[root@k8s-node2 ~]#
(3) 创建ingress规则
[root@k8s-master1 ~]# cat ingress-host.yaml
apiVersion: networking.k8s.io/v1beta1
kind: Ingress
metadata:
  name: hebye-ingress
spec:
  rules:
  - host: a.hebye.com
    http:
      paths:
      - path: /
        backend:
          serviceName: web
          servicePort: 80
[root@k8s-master1 ~]#
[root@k8s-master1 ~]# kubectl apply -f ingress-host.yaml
[root@k8s-master1 ~]# kubectl get ingress
NAME            CLASS    HOSTS         ADDRESS   PORTS   AGE
hebye-ingress   <none>   a.hebye.com             80      4m24s
[root@k8s-master1 ~]#
(4)在windows系统hosts文件中添加域名访问规则
192.168.31.73 a.hebye.com(5) 浏览器访问
http://a.hebye.com/

二十二、kubernetes核心技术-Helm(引入)
1、Helm引入
K8S上的应用对象,都是由特定的资源描述组成,包括deployment、service等。都保存各自文件中或者集中写到一个配置文件。然后kubectlapply–f部署。如果应用只由一个或几个这样的服务组成,上面部署方式足够了。而对于一个复杂的应用,会有很多类似上面的资源描述文件,例如微服务架构应用,组成应用的服务可能多达十个,几十个。如果有更新或回滚应用的需求,可能要修改和维护所涉及的大量资源文件,而这种组织和管理应用的方式就显得力不从心了。且由于缺少对发布过的应用版本管理和控制,使Kubernetes上的应用维护和更新等面临诸多的挑战,主要面临以下问题:(1)如何将这些服务作为一个整体管理(2)这些资源文件如何高效复用(3)不支持应用级别的版本管理。
2、使用Helm可以解决哪些问题?
1、使用helm可以把这些yaml文件作为一个整体管理
2、实现yaml文件高效复用
3、使用helm应用级别的版本管理
3、Helm介绍
Helm是一个Kubernetes的包管理工具,就像Linux下的包管理器,如yum/apt等,可以很方便的将之前打包好的yaml文件部署到kubernetes上。
Helm有3个重要概念:
(1)helm:一个命令行客户端工具,主要用于Kubernetes应用chart的创建、打包、发布和管理。
(2)Chart:应用描述,一系列用于描述k8s资源相关文件的集合
(3)Release:基于Chart的部署实体,一个chart被Helm运行后将会生成对应的一个release;将在k8s中创建出真实运行的资源对象
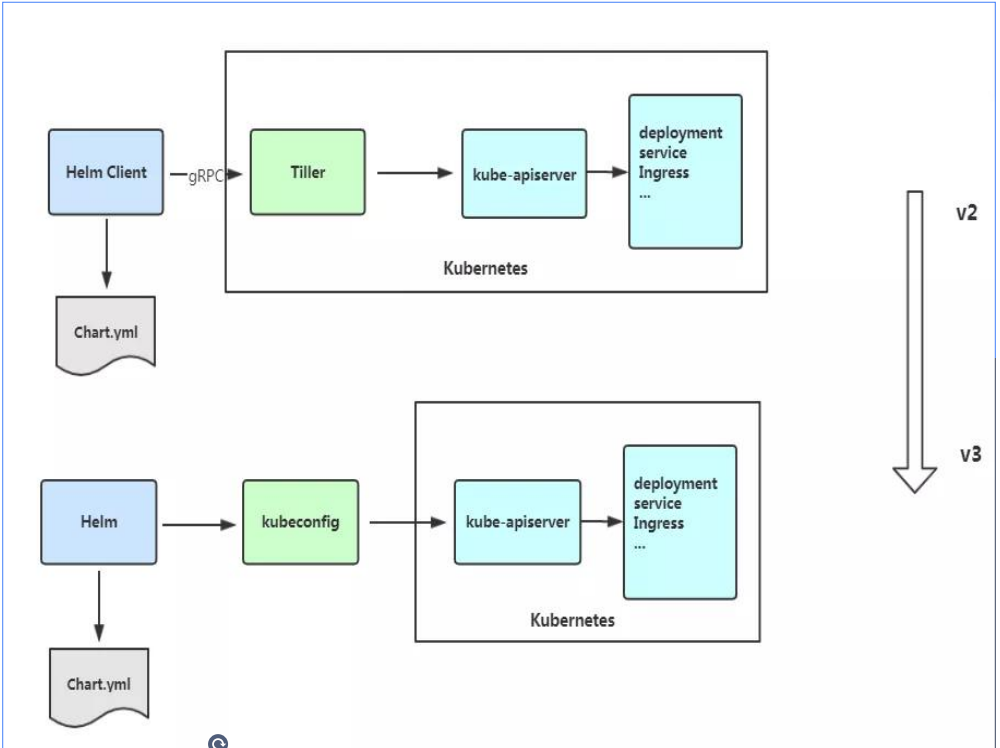
4、Helm v3变化
2019年11月13日,Helm团队发布Helmv3的第一个稳定版本。
(1)V3版本剔除Tiller
(2) release可以在不同命名空间重用
(3)支持将Chart推送至Docker镜像仓库中
架构变化:
5、helm安装
helm客户端下载地址:https://github.com/helm/helm/releases
解压移动到/usr/bin/目录即可。
[root@k8s-master1 src]# wget https://get.helm.sh/helm-v3.5.4-linux-amd64.tar.gz
[root@k8s-master1 src]# tar xf helm-v3.5.4-linux-amd64.tar.gz
[root@k8s-master1 src]# mv linux-amd64/helm  /usr/bin/
6、配置helm仓库
(1) 添加仓库
helm repo add 仓库名字 仓库地址
[root@k8s-master1 ~]# helm repo add stable http://mirror.azure.cn/kubernetes/charts
"stable" has been added to your repositories
[root@k8s-master1 ~]# helm repo list
NAME      URL
stable    http://mirror.azure.cn/kubernetes/charts
[root@k8s-master1 ~]#
[root@k8s-master1 ~]# helm repo add aliyun https://kubernetes.oss-cn-hangzhou.aliyuncs.com/charts
"aliyun" has been added to your repositories
[root@k8s-master1 ~]# helm repo update
[root@k8s-master1 ~]# helm repo list
NAME      URL
stable    http://mirror.azure.cn/kubernetes/charts
aliyun    https://kubernetes.oss-cn-hangzhou.aliyuncs.com/charts
[root@k8s-master1 ~]#
(2) 移除仓库
[root@k8s-master1 ~]# helm repo remove aliyun
[root@k8s-master1 ~]# helm repo update
[root@k8s-master1 ~]# helm repo list
7.使用helm快速部署一个应用
#搜索应用
#语法
helm search repo 名称(weave)
[root@k8s-master1 ~]# helm search repo weave
NAME                  CHART VERSION    APP VERSION    DESCRIPTION
stable/weave-cloud    0.3.9            1.4.0          DEPRECATED - Weave Cloud is a add-on to Kuberne...
stable/weave-scope    1.1.12           1.12.0         DEPRECATED - A Helm chart for the Weave Scope c...
[root@k8s-master1 ~]#
# 安装应用
#语法
helm install 安装之后名称 搜索的应用名称
[root@k8s-master1 ~]# helm install ui stable/weave-scope
#查看
[root@k8s-master1 ~]# helm list
NAME    NAMESPACE    REVISION    UPDATED                                    STATUS      CHART                  APP VERSION
ui      default      1           2021-04-16 18:12:21.070739644 +0800 CST    deployed    weave-scope-1.1.12     1.12.0
[root@k8s-master1 ~]#
#查看应用的详细信息
[root@k8s-master1 ~]# helm  status ui
#查看pod信息
[root@k8s-master1 ~]# kubectl get pods
NAME                                            READY   STATUS    RESTARTS   AGE
weave-scope-agent-ui-4q2gw                      1/1     Running   0          5m11s
weave-scope-agent-ui-4skzf                      1/1     Running   0          5m11s
weave-scope-cluster-agent-ui-5cbc84db49-qn2mg   1/1     Running   0          5m11s
weave-scope-frontend-ui-6698fd5545-ks8km        1/1     Running   0          5m11s
web-96d5df5c8-9scs2                             1/1     Running   2          6h47m
[root@k8s-master1 ~]# kubectl get svc
NAME             TYPE        CLUSTER-IP   EXTERNAL-IP   PORT(S)        AGE
kubernetes       ClusterIP   10.0.0.1     <none>        443/TCP        2d6h
ui-weave-scope   ClusterIP   10.0.0.108   <none>        80/TCP         5m21s
web              NodePort    10.0.0.112   <none>        80:31569/TCP   6h45m
[root@k8s-master1 ~]#
#修改service的yaml文件,type改为NodePort
[root@k8s-master1 ~]# kubectl edit svc ui-weave-scope
#再次查看
[root@k8s-master1 ~]# kubectl get svc
NAME             TYPE        CLUSTER-IP   EXTERNAL-IP   PORT(S)        AGE
kubernetes       ClusterIP   10.0.0.1     <none>        443/TCP        2d6h
ui-weave-scope   NodePort    10.0.0.108   <none>        80:30867/TCP   7m19s
web              NodePort    10.0.0.112   <none>        80:31569/TCP   6h47m
[root@k8s-master1 ~]#
#访问
http://192.168.31.73:30867/
8、自定义chart部署
1、使用命令创建chart
helm create chart名称
[root@k8s-master1 ~]# helm create mychart
Creating mychart
[root@k8s-master1 ~]# ls mychart/
charts  Chart.yaml  templates  values.yaml
[root@k8s-master1 ~]# cd mychart/
[root@k8s-master1 mychart]# ls
charts  Chart.yaml  templates  values.yaml
[root@k8s-master1 mychart]# ls templates/
deployment.yaml  _helpers.tpl  hpa.yaml  ingress.yaml  NOTES.txt  serviceaccount.yaml  service.yaml  tests
[root@k8s-master1 mychart]# rm -rf templates/*
[root@k8s-master1 mychart]#
chart.yaml :当前chart属性配置信息
templates:编写yaml文件放到这个目录中
values.yaml:yaml文件可以使用全局变量
2、在templates文件夹创建两个yaml文件
deployment.yaml
service.yaml
[root@k8s-master1 templates]# cat deployment.yaml
apiVersion: apps/v1
kind: Deployment
metadata:
  labels:
    app: web-chart
  name: web-chart
spec:
  replicas: 1
  selector:
    matchLabels:
      app: web-chart
  template:
    metadata:
      labels:
        app: web-chart
    spec:
      containers:
      - image: nginx
        name: nginx
[root@k8s-master1 templates]# cat service.yaml
apiVersion: v1
kind: Service
metadata:
  labels:
    app: web-chart
  name: web-chart-svc
spec:
  ports:
  - port: 80
    protocol: TCP
    targetPort: 80
  selector:
    app: web-chart
  type: NodePort
[root@k8s-master1 templates]#
3、安装mychart
[root@k8s-master1 ~]# helm install web-mychat mychart/
NAME: web-mychat
LAST DEPLOYED: Fri Apr 16 18:51:58 2021
NAMESPACE: default
STATUS: deployed
REVISION: 1
TEST SUITE: None
[root@k8s-master1 ~]#
[root@k8s-master1 ~]# helm list
NAME          NAMESPACE    REVISION    UPDATED                                    STATUS      CHART                 APP VERSION
ui            default      1           2021-04-16 18:12:21.070739644 +0800 CST    deployed    weave-scope-1.1.12    1.12.0
web-mychat    default      1           2021-04-16 18:51:58.604354864 +0800 CST    deployed    mychart-0.1.0         1.16.0
[root@k8s-master1 ~]#
[root@k8s-master1 ~]# kubectl get pod,svc|grep web-chart
pod/web-chart-684d5d86fc-2dcnm                      1/1     Running   0          68s
service/web-chart-svc    NodePort    10.0.0.83    <none>        80:30669/TCP   68s
[root@k8s-master1 ~]#
4、应用升级
#语法
helm upgrade chart名称
#升级
helm upgrade web-mychat mychat/
#例如将应用回滚到第一个版本
[root@k8s-master1 ~]# helm rollback web-mychat 1
#卸载发行版
helm uninstall web-mychat
#查看历史版本配置信息
[root@k8s-master1 ~]# helm get all web-mychat --revision 5
5、chart模板使用
实现yaml高效复用,通过传递参数,动态渲染模板,动态传入参数生成。
(1)、在values.yaml定义变量和值
yaml文件大体有几个地方不同的
image
tag
label
port
replicas
#查看模板文件
[root@k8s-master1 ~]# cat mychart/values.yaml
# Default values for mychart.
# This is a YAML-formatted file.
# Declare variables to be passed into your templates.

replicas: 1
image: nginx
tag: 1.16
label: nginx
port: 80

[root@k8s-master1 ~]#
(2)、在具体yaml文件中,获取定义变量值
在templates的yaml文件使用vlaues.yaml定义变量
通过表达式形式使用全局变量
例如:
{{ .Values.变量名称 }}
{{ .Release.Name }}
#查看定义好的deployment
[root@k8s-master1 ~]# cat mychart/templates/deployment.yaml
apiVersion: apps/v1
kind: Deployment
metadata:
  name: {{ .Release.Name }}-deploy
spec:
  replicas: {{ .Values.replicas }}
  selector:
    matchLabels:
      app: {{ .Values.label }}
  template:
    metadata:
      labels:
        app: {{ .Values.label }}
    spec:
      containers:
      - image: {{ .Values.image }}
        name: nginx
[root@k8s-master1 ~]#

#查看service
[root@k8s-master1 ~]# cat mychart/templates/svc.yaml
apiVersion: v1
kind: Service
metadata:
  name: {{ .Release.Name}}-svc
spec:
  ports:
  - port: {{ .Values.port}}
    protocol: TCP
    targetPort: 80
  selector:
    app: {{ .Values.label }}
  type: NodePort
[root@k8s-master1 ~]#
#查看生成的模板文件
[root@k8s-master1 ~]# helm install --dry-run web2 mychart/
NAME: web2
LAST DEPLOYED: Sat Apr 17 22:42:23 2021
NAMESPACE: default
STATUS: pending-install
REVISION: 1
TEST SUITE: None
HOOKS:
MANIFEST:
---
# Source: mychart/templates/svc.yaml
apiVersion: v1
kind: Service
metadata:
  name: web2-svc
spec:
  ports:
  - port: 80
    protocol: TCP
    targetPort: 80
  selector:
    app: nginx
  type: NodePort
---
# Source: mychart/templates/deployment.yaml
apiVersion: apps/v1
kind: Deployment
metadata:
  name: web2-deploy
spec:
  replicas: 1
  selector:
    matchLabels:
      app: nginx
  template:
    metadata:
      labels:
        app: nginx
    spec:
      containers:
      - image: nginx
        name: nginx

[root@k8s-master1 ~]#
#部署
[root@k8s-master1 ~]# helm install  web2 mychart/
NAME: web2
LAST DEPLOYED: Sat Apr 17 22:42:52 2021
NAMESPACE: default
STATUS: deployed
REVISION: 1
TEST SUITE: None
[root@k8s-master1 ~]#
#查看相应的pods,svc
[root@k8s-master1 ~]# kubectl get pods,svc|grep web2
pod/web2-deploy-6799fc88d8-x72ws                    1/1     Running   0          6m26s
service/web2-svc         NodePort    10.0.0.37    <none>        80:31267/TCP   6m26s
[root@k8s-master1 ~]#
#更新
[root@k8s-master1 ~]# helm upgrade web2 --set replicas=2 mychart/
[root@k8s-master1 ~]# kubectl get pods|grep web2
web2-deploy-6799fc88d8-d5wvt                    1/1     Running   0          99s
web2-deploy-6799fc88d8-x72ws                    1/1     Running   0          17m
[root@k8s-master1 ~]#
#回滚
#先查看部署记录
helm history web2
#回滚到REVISION 为2
[root@k8s-master1 ~]# helm  rollback web2 2
Rollback was a success! Happy Helming!
[root@k8s-master1 ~]#
#卸载应用
[root@k8s-master1 ~]# helm uninstall ui
二十三、kubernetes核心技术-持久化存储
1、nfs,网络存储
pod重启或者删除,数据还存在的。
第一步 找一台服务器nfs服务端,192.168.31.71
(1) 安装nfs
yum install nfs-utils -y(2) 设置挂载路径
[root@k8s-master2 ~]# mkdir /data/nfs -p
[root@k8s-master2 ~]# more /etc/exports
/data/nfs *(rw,no_root_squash)
[root@k8s-master2 ~]#
(3) 启动nfs
systemctl start nfs
systemctl enable nfs
(4) 在k8s集群node节点安装nfs
yum install utils -y(5)在k8s集群部署应用,使用nfs持久化网络存储
[root@k8s-master1 pv]# cat nfs-nginx.yaml
apiVersion: apps/v1
kind: Deployment
metadata:
  name: nginx-dep1

spec:
  replicas: 1
  selector:
    matchLabels:
      app: nginx

  template:
    metadata:
      labels:
        app: nginx
    spec:
      containers:
      - name: nginx
        image: nginx
        volumeMounts:
        - name: wwwroot
          mountPath: /usr/share/nginx/html
        ports:
        - containerPort: 80
      volumes:
        - name: wwwroot
          nfs:
            server: 192.168.31.74
            path: /data/nfs

[root@k8s-master1 pv]#

#应用资源配置清单

[root@k8s-master1 pv]# kubectl apply -f nfs-nginx.yaml

#创建svc
[root@k8s-master1 pv]# kubectl expose deployment nginx-dep1 --port=80 --target-port=80 --type=NodePort

#测试 添加页面
[root@k8s-master2 ~]# cd /data/nfs/
[root@k8s-master2 nfs]# ls
[root@k8s-master2 nfs]# echo "hello nfs" >index.html
[root@k8s-master2 nfs]#
#浏览器访问
[root@k8s-master1 pv]# kubectl get svc
NAME            TYPE        CLUSTER-IP   EXTERNAL-IP   PORT(S)        AGE
kubernetes      ClusterIP   10.0.0.1     <none>        443/TCP        4d23h
nginx-dep1      NodePort    10.0.0.176   <none>        80:32389/TCP   2m15

http://192.168.31.73:32389/
2、持久化存储 pv和pvc
PV和PVC
1、PV:持久化存储,对存储资源进行抽象,对外提供可以调用的地方。(生产者)
2、PVC:用于调用,不需要关系内部实现细节(消费者)
#创建pv
[root@k8s-master1 pv]# cat pv.yaml
apiVersion: v1
kind: PersistentVolume
metadata:
  name: my-pv
spec:
  capacity:
    storage: 5Gi
  accessModes:
    - ReadWriteMany
  nfs:
    path: /data/nfs
    server: 192.168.31.74
[root@k8s-master1 pv]#
[root@k8s-master1 pv]# kubectl apply -f pv.yaml
persistentvolume/my-pv created
[root@k8s-master1 pv]# kubectl get pv
NAME    CAPACITY   ACCESS MODES   RECLAIM POLICY   STATUS      CLAIM   STORAGECLASS   REASON   AGE
my-pv   5Gi        RWX            Retain           Available                                   3s
[root@k8s-master1 pv]#

#创建pvc,并将pvc绑定到pv上
[root@k8s-master1 pv]#
[root@k8s-master1 pv]# more pvc.yaml
apiVersion: apps/v1
kind: Deployment
metadata:
  name: nginx-dep1
spec:
  replicas: 3
  selector:
    matchLabels:
      app: nginx
  template:
    metadata:
      labels:
        app: nginx
    spec:
      containers:
      - name: nginx
        image: nginx
        volumeMounts:
        - name: wwwroot
          mountPath: /usr/share/nginx/html
        ports:
        - containerPort: 80
      volumes:
      - name: wwwroot
        persistentVolumeClaim:
          claimName: my-pvc

---

apiVersion: v1
kind: PersistentVolumeClaim
metadata:
  name: my-pvc
spec:
  accessModes:
    - ReadWriteMany
  resources:
    requests:
      storage: 5Gi
[root@k8s-master1 pv]# kubectl apply -f pvc.yaml
deployment.apps/nginx-dep1 created
persistentvolumeclaim/my-pvc created
[root@k8s-master1 pv]#
[root@k8s-master1 pv]# kubectl get pv,pvc
NAME                     CAPACITY   ACCESS MODES   RECLAIM POLICY   STATUS   CLAIM            STORAGECLASS   REASON   AGE
persistentvolume/my-pv   5Gi        RWX            Retain           Bound    default/my-pvc                           2m47s

NAME                           STATUS   VOLUME   CAPACITY   ACCESS MODES   STORAGECLASS   AGE
persistentvolumeclaim/my-pvc   Bound    my-pv    5Gi        RWX                           29s
[root@k8s-master1 pv]# 