1、概括
OpenLDAP安装完毕后,如果用户要修改密码的话,就需要通过OpenLDAP管理员来进行修改。
为了解放管理员的工作,让OpenLDAP用户可以自行进行密码的修改和重置,就需要我们来搭建一套自助修改密码系统。
在此我们使用的是开源的基于php语言开发的ldap自助修改密码系统Self Service Password。
2、Self Service Password安装
Self Service Password是一个Web应用,可以让用户自行更新、修改和重置LDAP中的用户密码。支持标准的LDAPv3目录服务,包括:OpenLDAP,Active Directory,OpenDS,ApacheDS等。
Self Service Password的官网
如下:https://ltb-project.org/doku.php
Self Service Password的源码github仓库链接,
如下:https://github.com/ltb-project/self-service-password
安装文档:https://self-service-password.readthedocs.io/en/latest/
Self Service Password官方提供多种安装方式,本文采用yum方式进行安装。
注意: CentOS 7 comes with PHP 5 by default, you need to install PHP 7.
框架:用Linux 环境 ,PHP7版本,Nginx作为站点建设
vi /etc/yum.repos.d/ltb-project.repo

[ltb-project-noarch]
name=LTB project packages (noarch)
baseurl=https://ltb-project.org/rpm/$releasever/noarch
enabled=1
gpgcheck=1
gpgkey=file:///etc/pki/rpm-gpg/RPM-GPG-KEY-LTB-project

yum update
rpm --import https://ltb-project.org/wiki/lib/RPM-GPG-KEY-LTB-project
yum install self-service-password -y

(网站安装在/usr/share/self-service-password/
3、安装PHP7.2
yum install epel-release
yum install http://rpms.remirepo.net/enterprise/remi-release-7.rpm
yum install yum-utils
yum-config-manager --enable remi-php72
sudo yum update
yum install php72
#安装php-fpm和一些其他模块
yum install php72-php-fpm php72-php-gd php72-php-json php72-php-mbstring php72-php-mysqlnd php72-php-xml php72-php-xmlrpc php72-php-opcache php72-php-ldap -y
(php72-php-ldap扩展一定要安装)
systemctl enable php72-php-fpm.service
systemctl start php72-php-fpm.service
4、修改PHP配置文件
vim /etc/opt/remi/php72/php.ini

session.save_path = /tmp
upload_max_filesize = 10M
post_max_size = 16M
max_execution_time = 600
request_terminate_timeout = 600
expose_php = Off
output_buffering = 4096

systemctl restart php72-php-fpm
5、安装Nginx及配置Nginx
 yum install nginx -y

 [root@client ~]# cat /etc/nginx/conf.d/ssp.conf
server {
listen 80;

root /usr/share/self-service-password/htdocs;
index index.php index.html index.htm;

# Make site accessible from http://localhost/
server_name ssp.hebye.com;

# Disable sendfile as per https://docs.vagrantup.com/v2/synced-folders/virtualbox.html
sendfile off;

    gzip on;
    gzip_comp_level 6;
    gzip_min_length 1000;
    gzip_types text/plain text/css application/json application/x-javascript text/xml application/xml application/xml+rss text/javascript application/javascript text/x-js;
    gzip_vary on;
    gzip_proxied any;
    gzip_disable "MSIE [1-6]\.(?!.*SV1)";

# Add stdout logging

error_log /dev/stdout warn;
access_log /dev/stdout main;


# pass the PHP scripts to FastCGI server listening on socket
#
location ~ \.php {
    fastcgi_pass 127.0.0.1:9000;
    fastcgi_split_path_info       ^(.+\.php)(/.+)$;
    fastcgi_param PATH_INFO       $fastcgi_path_info;
    fastcgi_param PATH_TRANSLATED $document_root$fastcgi_path_info;
    fastcgi_param SCRIPT_FILENAME $document_root$fastcgi_script_name;
    fastcgi_index index.php;
        try_files $fastcgi_script_name =404;
    fastcgi_read_timeout 600;
    include fastcgi_params;
}

    error_page 404 /404.html;
    location = /404.html {
            root /usr/share/nginx/html;
            internal;
}

# deny access to . files, for security
#
location ~ /\. {
        log_not_found off;
        deny all;
}

location ~ /scripts {
        log_not_found off;
        deny all;
}

}
[root@client ~]#

#参考文档:https://self-service-password.readthedocs.io/en/latest/config_nginx.html
6、修改Self Service Password的配置文件
Nginx的配置文件修改完毕后,我们再来修改Self Service Password的配置文件config.inc.php。
有关Self Service Password所有的安装和修改,我们都可以通过官网提供的帮助文档进行查询。如下:
https://ltb-project.org/documentation/self-service-password/1.4/config_ldap
vim /usr/share/self-service-password/conf/config.inc.php

#关闭 问题验证 和 短信验证(视个人需要,网站页面就不会显示):

$use_questions=false;
$use_sms= false;

#配置 LDAP
$ldap_url = "ldap://192.168.31.10:389";
$ldap_starttls = false;
$ldap_binddn = "cn=admin,dc=hebye,dc=com";
$ldap_bindpw = 'wdm123';
$ldap_base = "dc=hebye,dc=com";
$ldap_login_attribute = "uid";
$ldap_fullname_attribute = "cn";
$ldap_filter = "(&(objectClass=person)($ldap_login_attribute={
login}))";


$keyphrase = "HebyeLDAP-System";  //默认是secret,一定要设置,设置为任意字符就可以

#配置邮件
$mail_from = "no_reply@hebye.com";
$mail_from_name = "企业账号密码重置";
$mail_signature = "本邮件为通过密码自助修改LDAP账号密码,无需回复,如有重置密码遇到问题可以联系运维同学";
# Notify users anytime their password is changed
$notify_on_change = true;
# PHPMailer configuration (see https://github.com/PHPMailer/PHPMailer)
$mail_sendmailpath = '/usr/sbin/sendmail';
$mail_protocol = 'smtp';
$mail_smtp_debug = 0;
$mail_debug_format = 'html';
$mail_smtp_host = 'smtp.qiye.aliyun.com';
$mail_smtp_auth = true;
$mail_smtp_user = 'no_reply@hebye.com';
$mail_smtp_pass = 'xxxx';
$mail_smtp_port = 465;
$mail_smtp_timeout = 30;
$mail_smtp_keepalive = false;
$mail_smtp_secure = 'ssl';   //默认是tsl,需要修改成ssl,否则发送邮件不成功
$mail_smtp_autotls = true;
$mail_smtp_options = array();
$mail_contenttype = 'text/plain';
$mail_wordwrap = 0;
$mail_charset = 'utf-8';
$mail_priority = 3;


#安装sendmail
yum install sendmail -y
systemctl enable sendmail
systemctl start  sendmail
7、访问Self Service Password
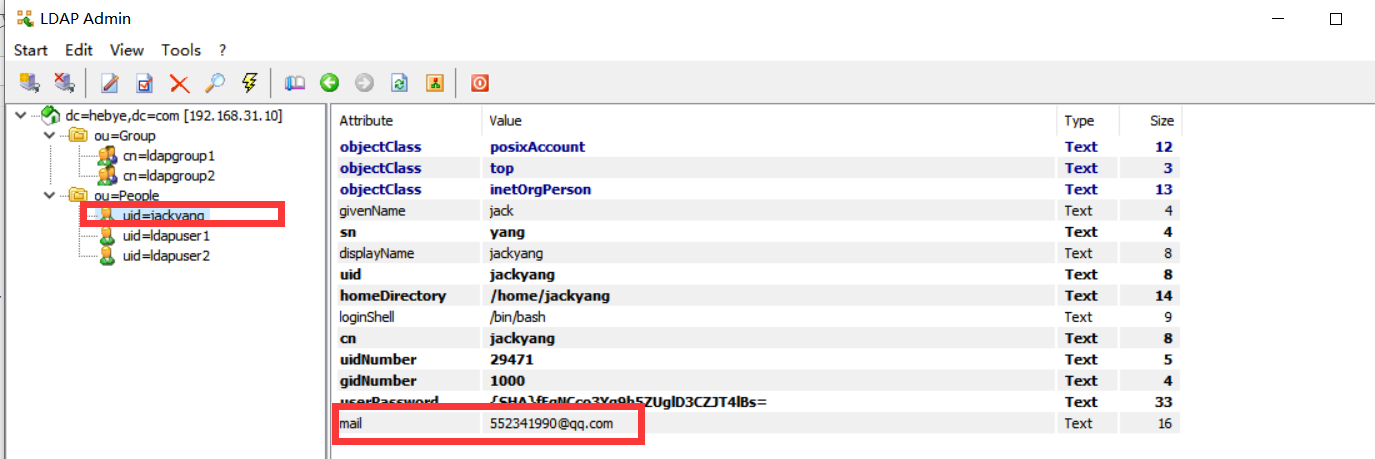
注意:LDAP中,通过邮件重置密码,用户字段中一定要有 mail
#启动Nginx和php
nginx
systemctl restart php72-php-fpm
[root@client ~]# systemctl restart php72-php-fpm
[root@client ~]# ss -lnt
State       Recv-Q Send-Q                                      Local Address:Port                                                     Peer Address:Port
LISTEN      0      511                                             127.0.0.1:9000                                                                *:*
LISTEN      0      511                                                     *:80                                                                  *:*
LISTEN      0      128                                                     *:22                                                                  *:*
LISTEN      0      10                                              127.0.0.1:25                                                                  *:*
LISTEN      0      1024                                                    *:389                                                                 *:*
LISTEN      0      511                                                  [::]:80                                                               [::]:*
LISTEN      0      128                                                  [::]:22                                                               [::]:*
LISTEN 0 1024 [::]:389 
(用户jackyang,字段中有mail,对这个用户进行修改密码和通过邮件的方式重置密码)
访问:绑定本地hosts,然后访问 http://ssp.hebye.com/

- 通过旧密码重置(知道旧密码)

修改成功后会收到邮件通知

问题:如果重置密码时出现问题:密码被 LDAP 服务器拒绝
原因:这是因为普通用户不能修改自己的密码导致的。
解决:
[root@client ~]# cat updatepass.ldif
dn: olcDatabase={2}hdb,cn=config
changetype: modify
add: olcAccess
olcAccess: to attrs=userPassword
        by self =xw
        by anonymous auth
        by * none

olcAccess: to *
        by self write
        by users read

ldapmodify -Y EXTERNAL -H ldapi:/// -f updatepass.ldif- 通过邮件重置密码(旧密码忘记)

收到重置邮件,进行重置即可

